Tuesday, May 26, 2009

Leftovers Calzones

The other day, I roasted one of these. It's a kabocha squash; basically a pumpkin but sweeter.


This is what the insides look like.


After scooping out the seeds, I used a big, sharp knife to cut the squash into 1 inch cubes. One of the wonderful things about kabochas is that you don't have to peel them. The skin is quite tender once it's cooked.


Next, I tossed it with olive oil and a generous pinch of salt. Ordinarily I would add a ton of pepper too, but I was going to put the squash in some sushi rolls I was making, so I decided against it.


Next, I spread the cubes in a single layer on a foil-lined cookie sheet and roasted them for about half an hour at around 400 degrees. You are trying to achieve a soft consistency with some caramelization around the edges.


I had about half of the squash left over last night so I was thinking what I could make. I also had a store-bought ball of pizza dough, some goat cheese, and a handful of each parmesan and shredded mozzarella. Pizza seemed like the obvious choice, but since the ingredients I had were a little dry, I decided they'd be perfect for calzones. I also decided to use pesto instead of a red sauce.

I preheated the oven to 475. There are a couple of little-known secrets to homemade pizza with a good crust texture. The first is a very high temperature. Trust me. The second is, if you don't have a pizza stone (which I don't) and are using a cookie sheet, let it preheat in the oven. This will help brown the bottom of the pizza or calzone.

Then I took my premade pizza dough out of the fridge and laid it on a lightly floured surface to relax a bit. I like to make things from scratch, but pizza dough is one of the things I'm perfectly happy to buy premade. It's cheap, good, and saves a ton of work!


Then I started with the pesto. I made quite a small batch, since my basil plant needs to recover from the last time (it's looking a little bare). I threw a bunch of leaves into the food processor, a pinch of salt, 2 cloves of garlic, crushed, a handful of parmesan, a generous 1/2 teaspoon of pepper, and some olive oil. The amount of oil depends on how the texture is when you process it. If it's not moving well within the food processor, add a bit of oil. I'd wager I used about a 1/3 of a cup.


Next I cut the pizza dough into four pieces and put three of them aside. I rolled the first piece into a ball then started flattening it out. You can either roll it, pound it, or stretch it. It doesn't matter, as long as you don't futz with it too much or the gluten will go crazy and your dough will be so stretchy that it will bounce back no matter when shape you try to coax it into.


Once the dough was a flat round about the size of my hand with my fingers outstretched, I spread it with pesto, some squash, bits of goat cheese and a sprinkling of mozzarella. The pesto can go on the whole thing but the rest of the toppings should stick to one side. Also, leave a rim for the dough to stick together. Fold over one side and pinch the edges closed with a fork. You want a good seal so the filling doesn't leak out and burn to the cookie sheet. Place it on a sheet of foil.


Repeat with the other calzones. Now take the hot cookie sheet out of the hot oven and lift the foil with the calzones onto it. Get it back into the oven and bake. Mine took about 20 minutes. I also decided about halfway through that I wanted to sprinkle a bit of parmesan on top of the calzones.


Once the outside is slightly golden and the crust sounds a bit hollow when tapped, take them out of the oven.


Serve hot.

Thursday, May 21, 2009

Escarfaux

While I was waiting for an onion to caramelize (see previous post), I decided to make some escarfaux from a bag of leftover mushrooms in the fridge. They are essentially mushrooms in a butter-garlic sauce, similar to that of escargot. The recipe originally came from my favorite cookbook ever, Clueless in the Kitchen, but they were called "Mushrooms Masquerading as Escargot." I decided they needed a better name, so I came up with Escarfaux. Rather fetching, no?

The ingredients:


My oven was already preheating to 375, but if yours isn't, do it now. A toaster oven works well for this too, if you have a casserole dish that is small enough to fit in your toaster.

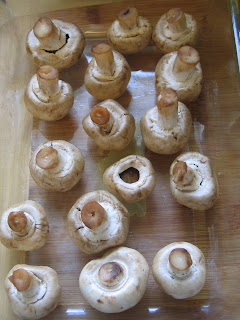
Wash a bunch of mushrooms and arrange them stem up in a casserole dish. Disregard the one that I accidentally broke the stem off of. Oops.


Now put half a stick of butter (or however much you have lying around, or a combination of butter and olive oil), a few cloves of garlic, minced, and a handful of parsley, chopped in a microwave safe bowl. I used a measuring cup because it has a spout, and it was clean. And i know for a fact that it's microwave safe.


Nuke it for 30 seconds to a minute, just until the butter is melted. It should smell amazing. If it doesn't, I can't help you.


Pour this mixture over the mushrooms, add a generous pinch of salt and a bunch of freshly ground pepper and throw it in the oven.


After about 15 minutes, or when the mushrooms are small, soft, and dark in color, take them out. At this point I put them in the dish I'd be serving them in, which in this case was a tupperware and poured the remaining sauce on top. If you're feeling saucy (get it?) you can drizzle them with a bit of a balsamic reduction (sounds complicated, but basically all it is is heating up a bit of balsamic vinegar in a sauce pan until it thickens up. It makes it sweeter) or a light squeeze of lemon juice.

Bruschetta with Caramelized Onions and Goat Cheese

I love making food that seems impressive but really took no effort whatsoever. This bruschetta falls under that heading. Bruschetta is basically toasty bread slathered with whatever you want. I had goat cheese so I decided to do a caramelized onion and goat cheese bruschetta. Very little effort is involved but it does take a while to caramelize the onions.

The ingredients


Preheat your oven to 375.

Peel and half an onion lengthwise. Slice it very thinly into crescents.


Heat a skillet to low heat and pour in enough olive oil to coat the bottom. Throw in the onion, making sure to separate the layers. Add salt and continue to cook until they get dark, being careful not to burn them. This will take quite a while, like over a half hour. Be patient.


Meanwhile, slice a baguette thinly. I do it at an angle because it's prettier and makes bigger pieces, but you can cut straight across too. It really makes no difference. I used a fresh seeded sourdough baguette, but it is my professional opinion that stale bread is why bruschetta was invented.


Place the slices on a cookie sheet and drizzle with some olive oil and sprinkle salt on them. Throw them in the oven. It doesn't have to be hot yet. Your aim is to dry out the bread and make it crispy, like a big crouton. Take them out of the oven when they seem crisp and very slightly golden.


When the onions are done, they'll have reduced a lot. At this point, place them on a cutting board and roughly chop them.


Slather as much or as little goat cheese on each slice of bread as you want. Grind some black pepper on, then add a little of the caramelized onion to each.


Toss back in the oven for a few minutes, until the cheese becomes melty. They are best hot, but I'm taking them to an opera rehearsal this evening so they'll be room temperature. They'll still be delicious though.

Monday, May 18, 2009

A Partial Panini Success

I had a DMV appointment with my dad this morning so I was back at my parents' house. I decided the best way to perk up after a long morning in the recycled air of one of my least favorite places was to make a really good lunch. There was half a loaf of stale baguette lying around, as well as some avocados and goat cheese. These gave me the idea of a panini.

The ingredients: I also used half a yellow bell pepper which is not pictured.


The first thing I did was revive the baseball bat masquerading as bread. I splashed it with water. Okay, i ran it under the faucet for a second or two, then popped it in the toaster oven and set it to 350. A few minutes later, when the water evaporated and the bread was hot, I was left with something resembling a fresh loaf of bread! Of course, you could just use fresh bread, but not all of us have that luxury.
Then I minced a clove of garlic and threw it in a microwave safe ramekin thingy. A bowl will work fine. I covered it with a few tablespoons of olive oil and microwaved it for 30 seconds. This essentially makes garlic oil.


I used a fancy silicone pastry brush and brushed it on the bread. Pouring works just as well. Just don't have a pile of garlic. Spread it out a bit. Then i drizzled (read: dumped) some balsamic on too.


Then i layered the bread with some chevre (aka goat cheese), avocado, and sliced bell pepper.


Next I added a handful of spring mix and a good coupla grinds of black pepper. In retrospect, I should have added a pinch of salt too.


Then I grilled it on the panini press I bought my dad one Christmas. Here is where I went wrong. You can't tell, but the bottom of the sandwich is Cajun-style. I heated the pan a bit too much. On my stove this wouldn't be a problem, but on an eighteen BTU (it's hot!) burner, it was. Next time I'll heat it at a lower heat and for less time. But whatever, knives were invented for a reason. You think cavemen didn't have to scrape char off their mammoth chops every once in a while?


And ta-da! a melty, warm, soft-but-crispy sandwich ready for your consumption. Actually no, me and my dad already ate it. But you can make your own!

Saturday, May 16, 2009

It's all Greek to me!

This weekend is hot in Santa Cruz. Incidentally, the Greek Food Faire is going on this weekend. So I decided to make what is possibly the most refreshing food out there. It just happens to be Greek too. Tzatziki is a delicious, raw, cold, tart, garlicky yogurt-cucumber-dill concoction that is delicious any time of year, but especially when it's hot out. And, keeping true to my cooking style, it's easy to make.

The ingredients:


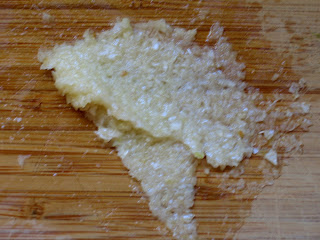
Crush and mince 2 large (or 3 small) cloves of garlic. Then add a pinch of salt and squish further with the side of your knife blade.


Throw the garlic in a bowl, then add a spoonful of yogurt and mix it up. This ensures that the garlic will be evenly distributed. I like to use Trader Joe's Mediterranean Cheese-Style yogurt. It's very thick and creamy. This saves me from having to add sour cream or cream cheese to make it creamier. If you don't have a TJ's around, just look for greek yogurt, lebni/labni, or kefir cheese.


Slice half a long English cucumber lengthwise and scrape out the seeds with a spoon. If you're really lazy you can leave them in, but I find that it waters down the tzatziki.


Now cut each half into about 4 matchsticks and slice thinly. You aren't making a rose out of a cherry tomato so don't worry about neatness too much. The yogurt will disguise awkward pieces. You just want the pieces to be pretty small. Throw them into the bowl.


Now chop up the dill. It'll be about 1 tablespoon chopped. I buy a bunch of dill and freeze what i don't use right away. It's the only herb that I know of that freezes beautifully, because it's so fine that no one can tell it's a bit wilty after its chopped. Toss the dill into the bowl.


Grind a lot of black pepper into the bowl. It's better with more pepper, I promise. Add another pinch of salt.


Add yogurt. For each cucumber I use a 16oz. thing of yogurt. I only had half a cuke left and half a tub of yogurt so it worked out perfectly. Besides, unless you're planning on eating a ton of tzatziki, make small batches. The cucumbers tend to get soggy in the fridge. It's better when they're super fresh and crisp.


Adjust the seasonings (I almost always add more pepper) and you're done. Eat it on pita chips, tortilla chips, or crusty french bread. I ate it on something I always keep in the kitchen for just such an occasion. A spoon.

Thursday, May 14, 2009

Hummus is Easy

... And so much quicker than driving over to Trader Joe's and deciding which of the seventy million varieties they have to get. Also, you know exactly what's going in and there are no preservatives. Always a plus, not to mention the fact that this makes twice as much for a fraction of the price.

The ingredients:


First drain the garbanzos, but retain the liquid. You'll use some of it to thin out the hummus.

Crush, peel, and roughly chop 2 cloves of garlic, or 3 if they're wimpy and small.


Add the beans, the garlic, a big spoonful of tahini (about a quarter cup), a generous pinch of salt, a bunch of ground pepper, and the juice of a lemon to your food processor.


Pulverize it. A lot. Hummus is not one of those dips you want chunky.


Once you are satisfied that there is enough salt, pepper, and lemon juice, add a generous drizzle of a good olive oil and blend again.


Ta-da!


At this point it's done, and delicious, but slightly boring-looking. You can eat it like this or add any number of accoutrements: roasted peppers or garlic, jalapeno and cilantro, sun-dried tomatoes, anything! The sky's the limit! I personally took the little scoop of pesto I had left over from the other night and dolloped it into a well I made in the middle. I'm taking it to an opera rehearsal potluck this afternoon (hence the very attractive tupperware serving vessel) with assorted crudite and the pesto will get swirled in with the hummus and make... wait for it... pesto hummus! I further garnished it with a sprinkling of paprika (make sure it's paprika and not cayenne, although cayenne hummus sounds good too! Just know what you're putting in.)

Quick and Dirty Beets

Okay, so yes, beets are dirty. They grow in the ground. They come caked in dirt sometimes. It's a pun! But they are probably my favorite salad accessory other than avocados (mmm...). And they are easy to make. You can roast them, but I think boiling is quicker and you don't have to preheat anything, which is especially nice when you want a nice spinach, beet, and goat cheese salad when it's hot outside.

What you need:


Trim off the stem end and if the skinny root tip is very long, chop that off too. You can save the greens. I always do, thinking I'll use them for something, but it hasn't happened yet. I just keep throwing them out when I buy my next batch of beets. But one day...


Now place them in a sauce pan and fill with cold water. Try to cover the beets, but if the pan isn't big enough, it's not the end of the world.


Cover the pan and boil them for anywhere from 15 to 30 minutes. The cooking time differs depending on your stove and the size of the beets. What you are trying to achieve is a beet that surrenders promptly when you stab it with a fork. It's hard to overcook them, unless, like I did a few weeks ago, you put them to boil then go watch and episode of Grey's Anatomy on your computer and forget about them until your housemate declares on the phone to her boyfriend "Something smells like it's burning but I can't figure out what it is!" at which point you leap up and run to the stove shouting an impressive variety of swear words. The water had all boiled off and the beets were beginning to burn on the bottom, but I reached them before too much damage was caused. And the saucepan was fine, which is what i was really worried about. I really like that thing!

Anyway, when your beets are tender, place them on a cutting board and let them cool. I like to use a plastic cutting board for this because the juice can stain, and plastic is easier to clean than bamboo.


When they are cool, start peeling the beets. This requires very little effort. Just hold it in your hand and squeeze it slightly with your fingers. The peel will come right off. Forgive the quality of this image. For some reason, my camera was refusing to focus. I need a photography camera, not just a snapshot one, for these pictures. They would be so much prettier. But such is the tradeoff of being a student.


Now quarter and slice them, or dice them, or if you are a certain type of person, take a big bite out one and lick your chops, pretending the beet juice is blood. Or not.

By the way, I think beets are probably the prettiest color I've ever seen in a vegetable. I also like the color of the inside of a butternut squash, but that's a different post.